 |

Tuesday, March 20, 2012
Letterpress Workshop

Letterpress Cards

At the letterpress workshop with Dana we got to make 2 different colored business cards. Our group choose orange and grey. I'm very impressed with how they turned out and can't wait to try my hand at letterpress again! It is really a lot of fun, all the tedious little things you need to do and then the product you get at the end of the day is just so rewarding!
Friday, March 16, 2012
Kim's Wedding Invitations

Look what came in the mail today! It seems like we were just sitting down at Starbucks talking about what she wanted on her invitations and here they are. Mailed out and ready for responses! It was quite the process but working with Kim and Dave was fantastic. Kim knew what she wanted which worked perfectly, there wasn't any guess work. Also we were on the same page with each other on how she wanted them to look so designing these for her was a joy. It was so much fun too going to Paper Source and flipping through all their wedding invitation books and feeling all the papers. I can't wait until I can design mine!! Ok maybe I can.
Thursday, March 15, 2012
Happy Pi Day!

Of course I will find any excuse I can get to bake a pie, naturally Pi day is the best one of all! This is a Lemon Meringue pie, my absolute favorite!!
Wednesday, March 7, 2012

Thursday, March 1, 2012
Baking sugar cookies with my Little May!

So LCAD was having a Type show this week and one of my teachers Matt Franz gave me these cookie cutters that punched out letters. Well the way the cutters worked is you cut out a square then made an indentation of the letter on the top. So Amy and I did that and we just got flat squares instead. Oh well, everyone loves cookies no matter what shape!
Friday, January 27, 2012
365 Photos - Infodesign Project
 I posted this post A Photo A Day in September of 2010, 9 months into my 365 Challenge where I was going to take a photo a day for an entire year. I am happy to say I succeeded & more!! Not only did I take a photo every day for the year 2010, I also made it my infodesign project for Catharine's Communication of Design class at LCAD.
This project really made me fall in love with the struggle of infographs & infodesign, which is also called Information Design. The project seemed right up my alley, organizing data & then making it look pretty?! Oh I'm so on that! I took all 365 photos & collected mounds of data from each photo.
Here are some images of it when it was up in the gallery at my school:
Monday, January 23, 2012

Thursday, December 22, 2011
New Apron!

Wednesday, December 7, 2011
Fiskars Trimmer Product Review
The process of retiring a trimmer...
So first of all I have to say, I love my all Creative Memories tools, my trimmer especially. This was the first trimmer I ever owned and I bought it when I was 14 with my own money so proud and special! But anyways that aside, I love it so this was a really hard decision for me to finally retire it. It has gone through its wear and tear and had its love and now I have moved on to Fiskars and I can tell you I do not regret my decision at all.

Sunday, December 4, 2011
101 Christmas Stocking Stuffers & Christmas Gift Ideas
Christmas is around the corner. Here is a list I compiled of 101 Stocking Stuffer and small Christmas Gift Ideas to help you brainstorm what to get your family and friends this holiday!


Thursday, December 1, 2011
Wreaths
I am going to be making some wreaths this year for sure for Christmas! I have found a ton of inspiration over on Pinterest.
This is a wreath I made for the 4th of July this year :
 |
| via |
Thursday, November 17, 2011

Friday, November 11, 2011
My New Western Digital 3TB Harddrive for $109!!!
 You gotta love Costco! Especially when they have something you want and then it goes on sale and you have a coupon for it! That was our case for our new 3TB harddrives!
That's right I said it. Not one or two TB but 3 lovely terabytes! Do you know how much stuff I can put on there? It is freaking amazing. And on top of it it was only $109, originally $129 but with a $20 off coupon. So cheap!
Monday, November 7, 2011
Laura Mae says, Hold On.
In the words of my best friend from middle school through high school:
"Life's tough. Wear a helmet."
- Cass

Saturday, November 5, 2011
CMYK Banner in my Senior Studio Space
 We finally got our senior spaces at LCAD. Now mind you don't go thinking they are the most luxurious things in the world but I am glad that we get them.
 Friday, November 4, 2011
Candy Fun
Seeing how Halloween just passed it makes sense to finally post this Fathers Day present I made for my dad this year haha. (You can tell school has kept me busy I haven't had any time to post this!)
But I guess this would be a good idea for left over Halloween candy?!
Basically we just went to the market with a notepad and stood in front of the candy section for about an hour while we made up the whole story, it was pretty fun actually!
*Please excuse the grammar since we were using candy bars as words hehe.
 |
Thursday, October 27, 2011
Free Social Networking Icons
I am currently working on designing my website www.laurafindley.com right now at school and one of my tasks was to find some good social networking icons to use. There are tons of beautifully designed icons out there but I was looking for plain and simple.
From my findings I made a collection of the social networking icons and have put them up for a free download. Each has at from 3-6 different sizes including 16px, 24px, and 32px. The list of the icons included in this free download are below.
From my findings I made a collection of the social networking icons and have put them up for a free download. Each has at from 3-6 different sizes including 16px, 24px, and 32px. The list of the icons included in this free download are below.
Thursday, October 6, 2011
Steve Jobs, Rest in Peace
 I just have to say that yesterday seeing this on Apple's website honestly made me cry. The design is so simple and they used such a stunning photo of Steve Jobs everything about it is so bold and heartfelt.
Tuesday, October 4, 2011
Holiday Cards
Last year I was on a roll and handmade 50 Christmas cards! If you are on our Christmas card list you just may recognize a card below!
Sunday, September 25, 2011
Wall Heart
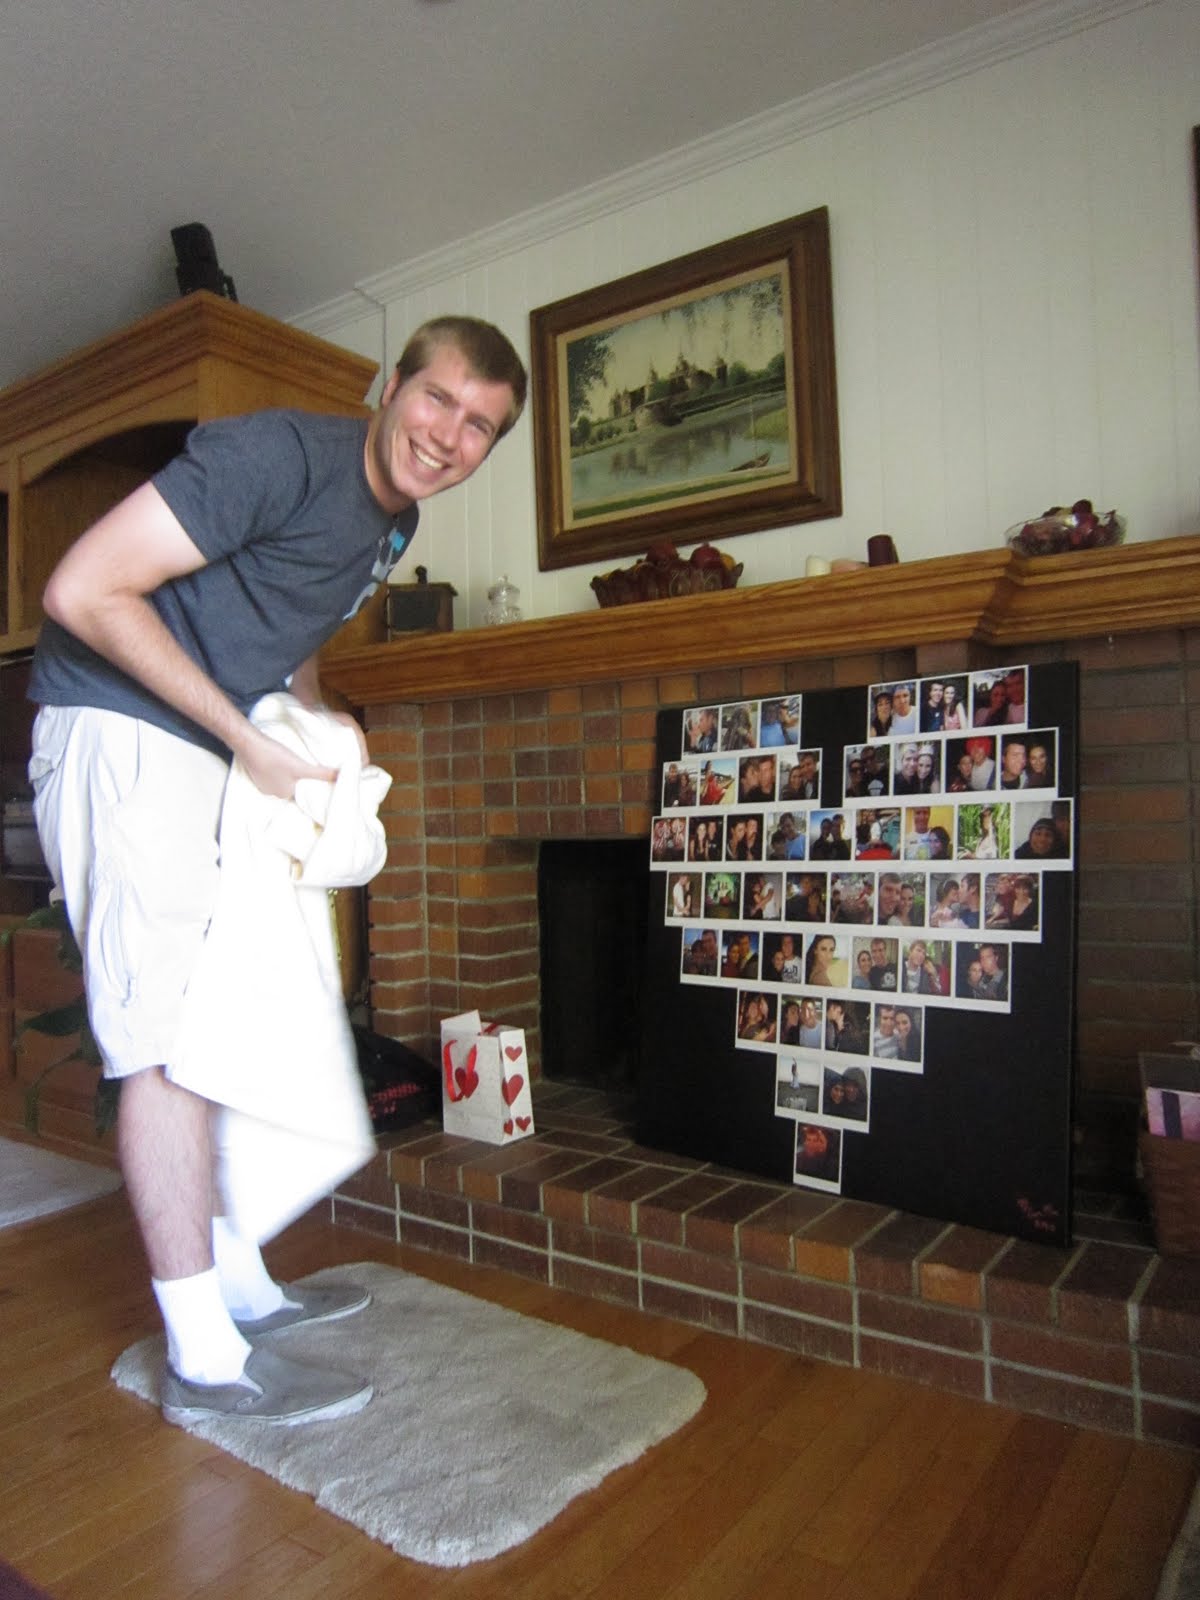 |
| Andy opening his gifts, he was super excited about the canvas piece! |
On top of the Mini Cake I made for Andy and I for our One Year Anniversary, I also made him a huge 36x36 canvas photo collage of 45 photos from the year. This was a more difficult task then I planned. Since it was so big I had to cover it with a sheet because it was too difficult to wrap. He had no idea and was thrilled when he opened it.
Tuesday, September 6, 2011
Anniversary Treats
Part 2 of my anniversary posts. The gifts!
Andy, being as wonderful as always, reserved us a Gondola ride in Newport Beach as well as making me a Fireman Build a Bear that says "I Love You" for our anniversary. He actually made the gift certificate for the gondola ride which was totally cute and included a framed photo of us on a boat to go along with the theme.

Andy, being as wonderful as always, reserved us a Gondola ride in Newport Beach as well as making me a Fireman Build a Bear that says "I Love You" for our anniversary. He actually made the gift certificate for the gondola ride which was totally cute and included a framed photo of us on a boat to go along with the theme.
The day after we got back from Yosemite he had the most beautiful bouquet of roses delivered to my house so I could enjoy them for the rest of the week while we were home. Smart man! I love him.
Thursday, September 1, 2011
One Year Anniversary Trip
Andy and I have officially been together for a year! Our Anniversary was August 14th. We celebrated by going on a trip to Yosemite with a stop in Ojai, CA on the way up.
Our actual anniversary was on a Sunday, the first day of our trip. So we stayed the night in the most beautiful little hotel in Ojai, CA called Chantico Inn & Suites. Our room was beautiful and pretty cheap for what we got, plus there was just one other couple staying at the hotel that night so we pretty much had the place to ourselves.
We went to the most wonderful dinner at Suzanne's Cuisine where we were greeted with Happy Anniversary the wonderful service continued all the way till we were walking out the door. The food was absolutely wonderful and made us want to come back the next day for more! But off to Yosemite we went instead. =)
Tuesday, July 5, 2011
Firework Cookies
 |
| Laura Mae's Firework Cookies |
They aren't quite as pretty as Martha's but they sure were delicious and a total hit at our 4th of July Party this year. Here is the easy How To.
Monday, July 4, 2011
4th of July Wreath
Happy 4th of July!! It is so beautiful here in lovely California today. I just had to spruce up our house with this lovely yet simple 4th of July wreath!
My 4th of July Wreath, see below for a pdf with instructions on how to make this wreath!
My 4th of July Wreath, see below for a pdf with instructions on how to make this wreath!
 |
Laura Mae's 4th of July Wreath
|
Thursday, June 23, 2011
Summer Projects-ABS Pipe Wine Rack
Back in Feb for Valentines day my wonderful Boyfriend got me a year subscription to Martha Stewart Living!! Yay!!
Just a few pages into the February issue was this amazing wine rack that I knew I had to make for my dad!
Martha used 4-Inch PVC pipe but my Home Depot only had 4-Inch ABS pipe, which is essentially the same thing when it comes to making a wine rack, now for typical uses like plumbing and what not theres probably an actual difference.
Just a few pages into the February issue was this amazing wine rack that I knew I had to make for my dad!
 |
| Martha's Version |
Martha used 4-Inch PVC pipe but my Home Depot only had 4-Inch ABS pipe, which is essentially the same thing when it comes to making a wine rack, now for typical uses like plumbing and what not theres probably an actual difference.
Blog Facelift
Its about time for a redesign!
I am on a mission to be creative and Summer Projects are a must! I have so many things I want to make, remake, bake, oh the list goes on! Be prepared for some creativity in the near future.
In the meantime what do you think of the redesign, simplicity at its best.
I am on a mission to be creative and Summer Projects are a must! I have so many things I want to make, remake, bake, oh the list goes on! Be prepared for some creativity in the near future.
In the meantime what do you think of the redesign, simplicity at its best.
 |
| New Logo |
Friday, November 5, 2010
Face to the Book
Yay! Christy and I finally have our Facebook up and running: http://on.fb.me/lmcpage
Check out our creativeness and be sure to post yours!
Wednesday, October 13, 2010
Bakerella Book Signing!
Christy and I went to the Bakerella Book Signing yesterday at the William's Sonoma at the South Coast Plaza. The wait was about an hour and a half which wasn't too bad. Christy and Lisa had to leave early to go back to work so I kept their books for them and got them signed. Angie Dudley (aka Bakerella), was really sweet and I was super excited that I got to meet her!
The book, Cake Pops. It is beautiful. I love the way it is all laid out, all the spreads are so simple and gorgeous! Love it!

Thursday, September 16, 2010


Friday, September 3, 2010
A Photo A Day
I started taking a photo every single day back in January. On the 1st actually. I always wanted to do it and start on the 1st of Jan but always forgot. This year I remembered and have made it 242 days so far this year.
Wednesday, July 21, 2010
Getting Crafty!!
Wow it has been wayyy too long since I was creative. I guess thats what happens when you let life take control. Now on to the craftiness!!
So the Little May and I were at the 4th of July street fair and we bought these headbands there. Cute right? Oh just wait it gets better! see those beautiful flowers on the sides? Ya they velcro on an off!! How genius is that! We each got a white headband and bought 3 flowers to share.
So the Little May and I were at the 4th of July street fair and we bought these headbands there. Cute right? Oh just wait it gets better! see those beautiful flowers on the sides? Ya they velcro on an off!! How genius is that! We each got a white headband and bought 3 flowers to share.
 |
| Little May and Big Mae |
Sunday, April 18, 2010
Tiara's and Tutu's

Christy, Gwen and I started getting together at least once a month to scrap. A few months ago we added some more girls and now we have a bigger group that moves from house to house. Friday night we were at Natalie's house and the theme was Tiara's and Tutu's. I was there from about 7pm-2am and I finished 4 pages!! Thats how slow I am, but its all good, I was enjoying everyone's company. This photo we all have our Tutu's on and are squinting our eyes for Heather, she always seems to have her eyes shut in every photo. All but one of us got the memo... ;)
Sunday, April 11, 2010
SCAL Coupon Code
I've got a Sure Cuts A Lot aka SCAL Coupon Code for 10% off!!!
Use the Coupon code 8774959 and you will get 10% off. The only problem is the offer expires tomorrow, 4.12.10.
Use the Coupon code 8774959 and you will get 10% off. The only problem is the offer expires tomorrow, 4.12.10.
Thursday, April 8, 2010
SEI April Kit
Yay!! Its always so exciting getting packages in the mail, especially when you know they are full of scrappiness
I love how every package is wrapped in tissue as if its a gift, well it kinda is =) OoooOO this month looks cute!! PINK!


I love how every package is wrapped in tissue as if its a gift, well it kinda is =) OoooOO this month looks cute!! PINK!

Sunday, April 4, 2010
Such a dancer

This is me, standing normal. Not normal to most people, but apparently it is normal to me to stand like the dancer that I am at all times. Cory took this photo without my knowledge and it made me laugh when I saw it later when I was putting photos on my computer.
Wednesday, March 17, 2010
Full of Scrappiness
This past weekend has been full of scrappiness which was well overdue and well needed. I had some bad news on Friday morning about my Uncle passing and everything has been crazy since. But I did get to scrap a lot this weekend, which was good. I didn't actually finish that much but when do I ever?
So my weekend started Friday night at The Scrappin Table in Placentia. That store is super cute but sad news they are closing. So they were having one last crop and Christy and I decided to pop in after work. They were pretty full which is always fun, but the store was very empty product wise which is always sad to see. We had scrapped there once before and loved it. The space was nice and open and they had tons of cute stuff to buy plus they had a Cricut and other cutting accessories. They are still going to continue their Blog that has tons of cute ideas from their amazing designers.
Thursday, March 11, 2010
Oh HTML
Welcome to the new design. I feel so special I figured out how to make pages in Blogger and I also figured out how to copy the HTML from my 365 project and edit it to make it fit on a Blogger Page. Check it out.
Click the navigation bar link above that says 365 Project or the link below.
So awesome!
Friday, February 5, 2010
Club SEI
At the expo a few weeks back I signed up for SEI's monthly kit. Its something I've been wanting to do for a while I just never did and this last expo I finally did it. Well I got it today and its so fun opening it! Yay! Here is what this month's kit had in it.


Monday, January 25, 2010
CHA 2010
 What a long and amazing day today!! Christy, Gwen, Natalie, Christine and I went to CHA's (Craft and Hobby Association) Super show. If you don't know what it is, it is basically like the Scrapbook Expo but with other types of crafts like sewing, jewelry etc. instead of just scrapbooking. We also went and participated in Scrapbook Royalty's World's Largest Crop Attempt Charity Event. Scrapbook Royalty is a group that hosts events like this and all the money goes to a certain Charity. The Charity we were donating to was the Kids In Need Foundation.
 Thursday, January 14, 2010
Chocolate Espresso Kahlua Tart

Wednesday, January 6, 2010
Scrapped
I didn't meet my goal yesterday, but I did finish September and October! So that means I digi scrapped 4 pages, and I had less time to do it because Cory came over at 7:30 instead of 8. I was pretty proud of myself. I will have this book done by the end of this week!
Tuesday, January 5, 2010
Digital Scrappin'
Going to do some digi scrappin...I've been telling myself that all day since 9am and its now 4pm. Thats the only problem with digi scrapping. You get easily distracted with everything on your computer, and we all know I'm one for being distracted very easily.
My challenge, finish September, October, November and December's layouts for 2008. Thats 8 pages, I can do that by 8pm right?
We are going to the Improv tonight so I need to be done by 8 so thats my goal.
Laura Mae
Monday, January 4, 2010
Happy New Year!
This is my first post for 2010! I'm pretty good huh? Normally it would take me like a month to remember to post on my lovely blog =)
So I have decided on my 365 Day challenge. I got my idea from the lovely Kelly Purkey. Check out her 365 Challenge last year. I'm going to take a picture every day this year (well try to at least). So far so good, I've got 5 pictures and today is the 5th. Awesome! I think for the end of the year I will make a digital book of all the pictures. I'm going to use a calendar template and in each day will be the photo. Or maybe I'll just make it a calendar, one I can't write on because each square will be full of a photo. Hummmm...
Here is a website you can go to to see my progress.
Anyone have any New Years Challenges?
Laura Mae
Tuesday, December 29, 2009
365 Challenge
I have always wanted to do a 365 day challenge but I never got around to figuring out what challenge I want to do or how I'm going to do it. I'm pretty sure, knowing me, if I actually do a 365 day challenge by day 10 I'll probably forget to do it and then it will all go down hill from there. I do want to do one next year. So I'm going to FIO and will be posting back soon (hopefully) what my 365 day challenge is going to be. Give me some ideas if you have any! I don't know where to start.
Oh and as for the rest of the cards I was working on, I've finished them all (yay!) I just need to get them up here for you all to see =)
Laura Mae
Saturday, November 21, 2009
Card Making on a Roll!
Dang I've been obsessed with making cards this past week. I think it has to do with the fact that I got my scrap corner back to normal last weekend, after over a month. I never unpacked from the expo that Christy and I went to in Ontario. Then we went scrapping with some amazing Gals who own Scrapping with Kits two weeks ago so I've been packed up for over a month now. It feels so good to be unpacked and uncluttered so I can make some cards.
Friday, October 30, 2009
CA Scrapbook Store List
I have finally finished it! I have been working on a list of Scrapbook Stores in California. I have cities from A-Z on it.
On this list you will find tons of stores that either specialize in just scrapbooking supplies or who carry scrapbooking supplies.
Some of the stores on this list have closed but I still keep them on the list so you can see if they are still there or not. Please contact me if you know of a store that is closed that is on this list and I will update it.
Some of the stores on this list have closed but I still keep them on the list so you can see if they are still there or not. Please contact me if you know of a store that is closed that is on this list and I will update it.
Here is the list, enjoy!
http://bit.ly/Scrappy_CA_Map
Laura Mae
Wednesday, October 7, 2009
Another Scrappy Scrapfest!
I was super excited after the last time I scrapped with Christy and Gwen at Timeless Treasures that I couldn't wait to scrap again, I still haven't unpacked! Haha. Which is perfect for me because this weekend I'm going to be scrapping my little heart out again!
This weekend is the Ontario Scrapbook Expo. Christy, Gwen and I all went to the Del Mar Expo back in May so this will be a 2nd expo for me this year. I don't even want to tell you how many expo's the other girls went to this year! Goodness! I'm pretty sure this will be the last expo for this year since the next one is up in Sacramento, CA. But you never know, Christy and I did make a trip up there last fall to do some scrapping, that wasn't the whole reason for the trip but it added too it =).
Sunday, October 4, 2009
The Good and The Bad
A catastrophic event just happened in my scrap corner.
So I have a box full of CM kits from when I used to be a consultant. All the kits were opened because I used to sell the sheets individually at crops and events. This box has a lid but of course with my luck the lid is no where to be found.
The story starts with me sitting here in my comfy chair, coffee in the cup holder next to me, computer on my lap, responding to emails from the weekend.
Wednesday, September 23, 2009
Scrapfest Photos!
Here are a few photos of the 3 gals getting their scrap on!
p.s. You can get a glimpse of the store behind us too. See that wall of diecuts! Crazy huh? And thats not the half of it either.
Gwen, doing her thing!
Sunday, September 20, 2009
And the Tally is...
16 Pages!! Woot Woot! Which also means...drum roll please.......I Finished my Album! I am super excited and can't wait to get some pages uploaded so I can show you.
Yesterday's Scrapfest ended up being a success at Timeless Treasures. There was a very squeaky paper trimmer that I wanted to throw. out the window but other than that, 12 hours of scrapping and I finished my album. What an accomplishment. =)
I updated my review on Timeless Treasures store too, now that I've actually scrapped there. There is a lot of room to crop, which is awesome for me because I always seem to overpack. Well I say that but I actually had to run home real quick yesterday because I needed more pages haha. Good thing TT is close to my house.
We are working on getting together again in October for another Scrapfest, check back for details so you can come too!
Laura Mae
Friday, September 18, 2009
Saddness
Sad news in the scrappy world. As my post below this mentions, we had plans to go to The Scrappin' Table for an all day Scrapfest. The store is open from 10-6 on Saturdays and then on top of it they were having a Crop for $8 from 4 to Midnight so we were going to take advantage and be there allll day. Well sad news, they are deciding to cancel the night crop because they needed at least 8 people to show up and there were only going to be 4 of us. Bummer. So good ol' Scrappy got on it and called everywhere but everyone seems to be booked for tomorrow. Let me tell you making plans to go scrap on a Saturday night last minute is hard!
So now our plans have changed and instead of going to a store completely new to the three of us we are going to Timeless Treasures in RSM. Its the more expensive choice ($22 total for the whole day!) but we are obsessed scrapbookers and know it will be worth the price. There is another catch about TT. They might make us leave at 10pm instead of Midnight if they don't have enough people show up for the night crop, which is understandable because they need to make it worth their while too.
Needless to say we will be scrapping tomorrow no matter what! Check out LMC's Twitter for updates throughout the day because we will be posting!
Laura Mae
Monday, September 14, 2009
Scrapfest here we come!
Watch out there be scrappin' about! This Saturday, Sept. 19th, I will be accompanied by my best scrappin gals, Gwen and Christy (aka. Scrappy) on another Scrapfest! I'm super excited!
All three of us are hardcore obsessed scrapbookers and its hard to get together often because of the distances between our homes but when we do, we turn it into a full blown scrapfest! For the definition of scrapfest check out Christy's blog.
So this weekend the store we will be gracing our amazing prescene is in Placentia, CA. We are scrapping at a store called The Scrappin' Table. I've never been to this store before but the website looks freaking cute! Be sure to check back for an updated Scrapbook Store list when I add my 2 cents about The Scrappin' Table.
Our Scrapfest will start early early early in the morning, the second the store opens. This is where Starbucks really makes money =). I plan on working on my Birthday trip to Las Vegas and finishing that Album! Ooooo what a goal. I can totally do it. I'll be sure to post up some layouts that I finished this weekend.
Check out LMC Studio's Twitter for updates during the Scrapfest day!
Laura Mae
Cricut Layouts
Here are all the layouts I've uploaded to 2 peas that I used my Cricut with:
Thank You cards (Year of Cards): We used my cricut to cut out all the circles.
A Year of You-Jan 2009: I used my Cricut to cut out the Jan and some flowers.
Mini Easter Cards: I used my Cricut to cut out the Basket and eggs.
March Photos: I used my Cricut to cut out the large scalloped circle for the background.
Stamped Background Card: Used my cricut to cut out some shape to piece together
i <3>: I cut out the I, circle and U using SCAL and my Cricut.
Life is Amazing: I cut out the Paper Stars with the Platin Cartridge.
With Sympathy: I used the Wild Card Cartridge to cut out the card and envelope.
A Year Of Me- April: The big bracket diecut I made in Illustrator and turned it into a svg file and brought it into SCAL so i could cut it out on my Cricut.
Dad Card for Father's Day: I used the Wild Card Cartirdge to cut out the word "Dad" on this card.
Gift Card and envelope: I took the sketch for the envelope and made it a svg file so I could cut it out in SCAL with my Cricut.
Owl Card: I used the Wild Card Cartridge to cut out the branch on this card.
June: I used my Cricut a lot on these layouts. I first made a svg file of a closed bracket then Cut out my photos and papers with SCAL and my Cricut. Then I pieced them together to make a full bracket.
Be sure to check out the latest Cricut Promotion, The
! Purchase one of 4 new Cricut catridges for a chance to win a new Gyspy (handheld design studio for Cricut), $2,000 travel vouchers and even a $30,000 trip to one of 5 fabulous locations!
Laura Mae
Saturday, August 29, 2009
Cake Pops Layout
I've decided to start a Digital Recipe Book. I'm going to cook, bake, fake (hehe) whatever it is and take pictures along the way and then digitally scrap it so I can print out a page print and put it together in a book some how. That last part I haven't figured out yet but here is my first page.
Hopefully by the time I have children I'll have a huge recipe book and they will be able to cook from it!
Thats my goal with this project.
Friday, August 28, 2009
Scrapbook Stores
(Updated Timeless Treasures 9/20/09)
I've decided to make an ongoing list of Scrapbook Stores or places that sell Scrapbooking Materials that I've been too and I'll give you my 2 cents on them. Some of them will have crop spots and some wont. I'll be sure to put an * by the ones that have a crop space or host workshops. They are all actual stores and not online spots, but some of them have an online store. Note most of these will be in Southern CA because that is where I'm located but if you have any you'd like to add feel free to post up your 2 cents!(These are alphabetical, they aren't in order by favorite or anything like that. That would be unfair.)
Scrapbook Oasis*: 17895 Sky Park Circle #H, Irvine, CA (949) 756.2729
I loooove going to Scrapbook Oasis to Crop. They have a huge crop area in the back. You can come in and crop there for FREE whenever you want, well as long as they are open and don't have a Workshop or class going on. Its nice to call them before you go just to make sure they aren't teaching because sometimes they have last minute events and you don't want to barge in thinking you can crop when you can't. The owner is super sweet and helpful too. They also have a cutting center where they have QuickCut dies and trimmers and tons of punches that you can use while you are cropping there. Another thing they have is a trade basket where you take a piece of whatever is in there and replace it with something from your stash. Thats always fun to look in. They have a small fridge and microwave too which comes in handy. for Lastly they are very up to date with all the latest trends in the scrapbooking world and have sales often, they even have a clearance table that is amazing and always full.
Scrappin In the Hills*: 5773-J Santa Ana Canyon, Anaheim Hills, CA 92807 (714) 998.8855
20 minutes away from Disneyland, this is a perfect quick drop in and buy everything in the store Scrapbook Store. The store is pretty big and they have crammed everything you could ever want in there. When I go I walk the isles about 10 times before I finally convince myself I need to get out. They have a FREE Crop and Shop during their store hours as long as they don't have a Class or Workshop going on. Be sure to call ahead if you are dropping in so they can set up room for you, the store is so crammed of product they need to know ahead of time if you are coming to crop. I loved cropping there because they have so many cute and do-able samples up all over the walls. I copied at least 5 last time I was there. Such good inspiration. They also have tons of classes and you get 10% off during the class/workshop you are taking which is amazing. They also have a die-cutting center with a ton of QuickCuts dies that you can use while you are cropping there.
Timeless Treasures*:30505 Avenida de las Flores, Suite B, Rancho Santa Margarita 92688 (949) 888.7151
TT has a pretty big store and it is full of ideas everywhere you look. This is a great place to go just to get some inspiration. The store is very organized and always full of new product. They have a pretty full calendar, usually there is something going on every day and they have drop-in crops for $5 for every 4 hour block. A lot of the crop nights you have to call ahead. They have a big die center where you can come and use all their dies for $2/30min. You get to use the die center free if you are cropping there. Watch out for their paper trimmer when you are there because it squeaks like no other! I suggest setting up your stuff as far away from the die cutting center as possible, unless you want your ears to ring for a few days (I learned that the hard way). They do have a huge crop area with big wood tables and chairs and lots of room to put all your stuff, a good thing for me =). They have a fridge in the back croppers can use and it is loaded with drinks for 50 cents a piece and a microwave too. An all day crop can be a little pricey, but just check their calendar because they always have events going on.
Tuesday, August 25, 2009
Cake Pops
If you haven't heard of Bakerella's Blog you definately need to check her out! She started her blog in 2007 and has been baking and posting her amazing creations since.
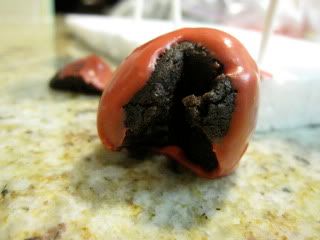
So the other day she put up these amazing cute little Cake Pops that she made and I was inspired had to try them out my self. Mine didn't turn out nearly as cute as hers but they were devoured so that tells me something.
Here are my steps to making the Cake Pops. Hop on over to Bakerella's Blog to see the recipe.
Bake me a cake as fast as you can!
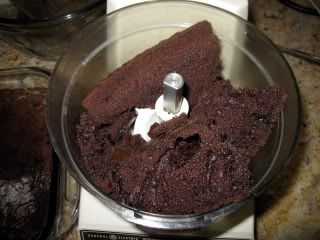
Pretty nice cake isn't it? Well don't get too attached to this photo, or your cake for that matter if you are following along.
Stick your cake in a food processor! What!!! Yep, you are going to have to shred your cake to pieces!Wait till it is cool first then stick chunks into a food processor until it is finely ground, pour into a bowl.
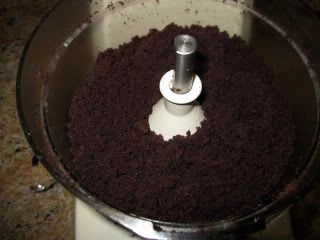
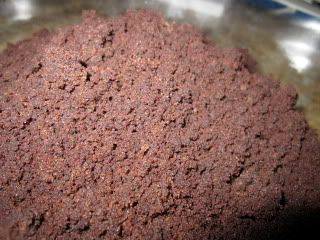
Here is what your cake should look like now. It looks like the beginning to a dirt dessert, remember those in elementary school, ground up oreos and pudding with gummy worms! Yum.
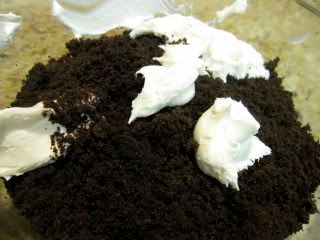
Ok so now you have it all ground up, throw some frosting on top. Literally throw it, frosting is thick so it doesn't just slide off your spoon or spatula easily. You are going to have to chuck it off. I only used about a fourth of the frosting, you don't need a lot.
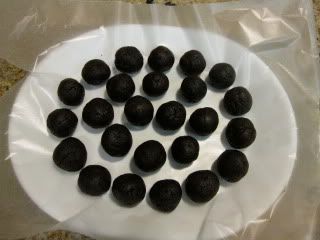
Now its time to get messy, mash up your cake mixture with your hands, you can use a spoon but your hands is more fun! You want your mixture to be like one big ball in the end. Once it is like that start making little balls.

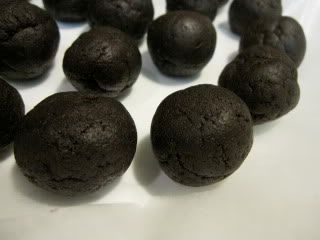
Cake Balls! So start rolling our a million little balls. I put mine on wax paper and then on a plate so I could put them in the freezer easier. So once you have finished rolling all your balls pop them in the freezer for a little, about 10-15 minutes just so they can harden. Don't freeze them or make them too cold because then they won't dip well.
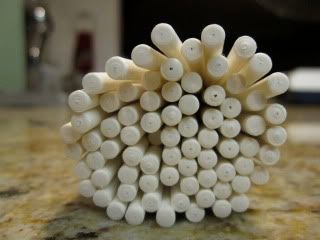
Here comes the hard part. Turning your cake balls into cake pops.You will need lollipop sticks. Local craft stores have them in the Cake Decorating isles usually.
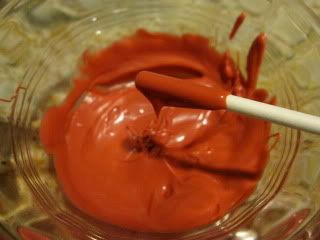
You will also need Candy Melts. I chose red but they come in tons of different colors.
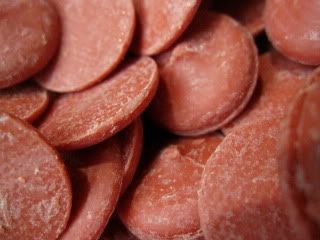
So melt your candy melts as directed on the package, usually its just pop it in the microwave for 30 second intervals, stirring in between.Then dip in your lollipop sticks so there is a little bit of chocolate on the stick.

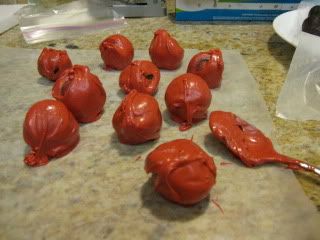
Here is a part I don't really have photos of, because it was extremely tragic. So you are supposed to stick the lollipop stick into your cake ball then dip that into the chocolate and turn it a little to make it nice and smooth. Welllllll, there is a problem with that.Sounds so easy right? Well its a lot harder than it looks and I gave up. Every single cake ball fell off its stick and into the chocolate, so I had to dig it out with my fingers (this is why I don't have pictures because I had chocolate covered fingers)So after digging the first few out i just decided to dip them with a spoon and cover the ball as much as possible. Now I'm making Messy Cake Balls! Yay!
But then I had all these sticks left over, so i figured might as well use them.
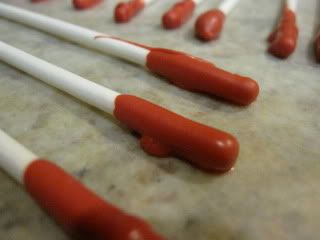
I stuck all the sticks into all the covered cake balls. I had a lot left uncovered because I ran out of chocolate. Once they were on the stick I jammed the stick into styrofoam so they would stand up to dry.
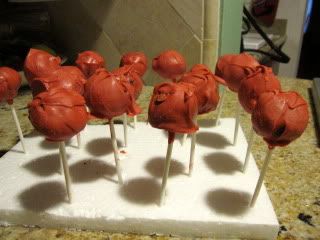
This one looks yummy huh? Not perfect but good enough to eat!
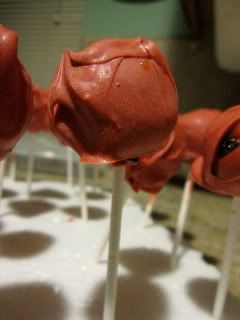
Oh know! Man down! I had a little problem with falling cake balls! Some of them were too hot still when I stuck them on the stick an slid right off.
 So that was my adventure with making Bakerella's Cake Pops. Hopefully my next adventure will be a little prettier, I can't say it wasn't successful because they were gone before I knew it!
Subscribe to:
Posts (Atom)